

Blogging is more than just writing; it’s about creating a platform where you can connect with like-minded individuals, share valuable insights, and build a community around your passions. As you embark on this blogging journey, you’ll discover the joys of crafting engaging content, the thrill of seeing your readership grow, and the satisfaction of making a meaningful impact.
This guide will not only help you navigate the technical aspects of setting up a blog but also provide tips on developing a unique voice, understanding your audience, and staying motivated. With the right strategies and a bit of dedication, your blog can become a powerful tool for personal and professional growth.
So, let’s get started on building a blog that reflects your unique perspective and resonates with readers around the world!
Follow These 9 Steps to Learn How to Start a Blog and Make Money as a Blogger Today:
1.Pick your blog niche.
2. Choose a Suitable Blogging Platform.
3. Create a blog name and URL.
4. Design Your Blog.
5. Create the Main Pages of Your Blog.
6. Brainstorming Blog Topics.
7. Write your first blog post.
8. Find ways to grow your blog.
9. Make money blogging: A Comprehensive Guide.
In this step-by-step guide, you’ll find all the guidance and tools you’ll need to start a blog and get writing blog posts. You’ll learn how to make your website, write your first blog post and draw in loyal readers. Sounds exciting? Let’s dive in.
1.Pick your blog niche
A niche is a specific topic that your blog will focus on, and it’s key in determining your target audience. A strong blog niche can also help you pick the perfect blog name and develop a focused blogging strategy.
Examples of blog niches include books, travel, gaming, photography, and food.
Blogging opens up a world of possibilities, where your voice can resonate on topics ranging from health and fashion to finance and travel. With such a diverse landscape, how do you pick the perfect topic for your blog?
The secret ingredient? Passion. Blogging thrives when fueled by genuine interest and enthusiasm. Whether it’s a subject you know inside out, something you’re deeply passionate about, or simply a topic close to your heart, choosing a blog theme that ignites your enthusiasm is paramount.
Why? Because when you’re genuinely excited about your content, blogging transforms from a task into a joyous adventure. Your passion infuses every word you write, captivating your audience and keeping them coming back for more.
But what if your interests span across multiple topics? Fear not! Embracing versatility is an option. You can opt to explore a variety of subjects or hone in on a specific niche, such as personal finance or self-help. The key is to strike a balance that allows you to indulge your interests while delivering valuable content to your readers.
So, how do you decide what to write about? Look inward and listen to your heart. What topics set your soul on fire? Which subjects do you find yourself gravitating toward time and time again? Whether it’s relationships, health, or sharing snippets of your daily life, let your passions be your guide.
Ultimately, blogging is about more than just carving out a niche—it’s about discovering your voice and sharing it authentically with the world. So, embrace your passions, let your unique perspective shine through, and watch as you inspire others with your words.
When searching for the ideal niche for your thriving blog, remember to consider the following pointers:
Pick a Niche That You Like or Are Passionate About
Writing about a topic you enjoy will always be more fulfilling than forcing yourself to write about something you’re uninterested in.
Consider your hobbies and interests or topics you’d like to learn more about. Then, make them more specific. If your passion is food, try focusing on a particular cuisine like Japanese, Mexican, or Italian.
Similarly, if you want to start a book blog, consider blogging about reading on a budget or specific literary styles.
Select a Niche That Has Audience Potential
Your main topic should have a level of pre-existing interest to ensure you’ll have an audience to target. Use Google Trends to find the search volume of specific keywords related to your niche and determine whether enough people are discussing it on social media and community forums.
This way, you’ll know what’s trending in your niche and which blog post ideas have more engagement potential.
You Don’t Have to Be an Expert to Profit From a Niche
Being a topical expert gives you a certain authority that many readers look for, but it’s not a requirement. What’s more important is having a unique perspective on your niche and being eager to learn more.
For example, you might not be a professional photographer, but you can still start a photography blog as a beginner. To help build authority, feature interviews with experts on your blog.

Some things that you may want to think about when choosing your blog topic include:
What do you enjoy talking about? Because learning how to start a successful blog can be hard work, I always recommend that you start by thinking about what you are passionate about. Perhaps it’s a sport that you really love, crafts, cooking, managing money, travel, or something else. Whatever it is, blogging about your passion is great because that will show in your writing, and your readers will enjoy that. It can also help keep you motivated.
What things do you like learning about? Like I said above, you don’t need to be an expert in a topic to blog about it. People LOVE reading blogs from people who are learning or trying new things. This is because everyone has to start somewhere, and people love following the journey and seeing how something is actually done. So, if you are learning how to start a successful blog, for example, that could be what you blog about. You can write about all of your mistakes, talk about what you’ve learned, show how you have tried and reviewed different options, and so on.
What blogs do you enjoy reading? If you are thinking about starting a blog, I’m assuming it’s because you probably enjoy reading blogs yourself. If that’s the case, then you may want to think about which blogs you really enjoy spending your time on, and possibly blogging about something similar.
What are you an expert in? Now, you don’t need to be an expert in your blog’s topic to earn money blogging (more on that below), but if you are an expert on something, then this could be a topic that you blog about. There are many successful “How To” websites because people love to learn new things through blogs. And, there is probably something you could teach (everyone’s an expert at something, even if you don’t realize that yet!). Think about the questions your friends and family are always asking you about, topics that you enjoy helping others with, and so on.
Here are some possible blog topic ideas. The list doesn’t end here either. Choose one, all, or some. It’s all up to you.
- Your life
- Home
- Family
- Finance
- Crafts
- DIY
- Small business
- Outdoor activities
- Fitness and health
- Food
- Inspiration and advice
2. Choose a Suitable Blogging Platform
At this stage, starting a blog involves getting your blog online. That’s where a web hosting company comes in. You’ll need to choose a blogging platform and a web hosting package to get your blog up and running.
What is web hosting?
To make your website accessible to other people on the Internet, you need a “host.” The host keeps all your website files safe, secure and makes sure that people can access your blog when they click on a link or type in your URL. Think of web hosting as being like your home. When someone comes over (types in your blog’s URL), they’ll be able to see what’s inside.
How much does web hosting cost?
Web hosting comes at a low cost (around $5/mo) with a high quality hosting provider like Bluehost. Having a proper hosting company to power your blog is one of the most important investments you can make when getting started.
With other website builders, such as WordPress, you will need to find and pay for a separate web hosting platform. Some popular options include:
- BlueHost
- HostGator
- GoDaddy
- DreamHost
The 2 Best Alternative Blog Hosting Platforms Worth Considering
- Dreamhost — I’ve hosted literally dozens of websites on Dreamhost over the years (and I still do). All similar features like 1-click WordPress install, free SSL certificate and site security aside, one of the biggest pros of going with Dreamhost compared to other hosting companies, is that they offer a true plan you can pay month-to-month that allows you to pay for the cost of your blog hosting each month with no strings attached. Here are a few other web hosting companies that also offer monthly payment plans and have 30-day money-back guarantees.
- HostGator — The thing that sets HostGator apart from other hosting companies, is their fantastic level of customer support and the fact that they also offer a true monthly payment plan (which helps if you’re starting your blog on a budget). HostGator ranks amongst the largest hosting companies, now powering over 8 million+ websites around the world, making them a great partner to scale your blog with over time.
If you’re not sure which web hosting platform to choose, take into account these factors:
- Customer support: Customer service you can contact in the event something goes wrong. Ideally, your hosting provider should offer an online help center, offer callbacks and respond to questions and concerns on social media.
- Uptime: The amount of time that the server hosting your website is up and running. A strong uptime rate (99.95% or above) is a good indication that the host’s servers perform well.
- Bandwidth: The amount of data your website can transfer to visitors over a certain period of time. This factor is based on the size of your website pages as well as the amount of traffic you expect. This quick bandwidth calculator can help you determine your site’s bandwidth.
3. Create a blog name and URL.
One of the most crucial steps when starting a blog is deciding on a name. It’s not just a string of simple characters but a symbol of your mission, your identity, and the sweat you pour into your work. You might have experienced this feeling – the pressure to create an impressive name, one that carries deep meaning and makes a strong first impression on readers.
I remember when I started, every word in the blog’s name posed questions to myself: “Does it evoke emotion? Does it reflect my true self? And can it attract attention from readers?” The process of choosing this blog’s name felt like creating a representation of myself on a grand stage, where every word and action is recorded and sent out.
But amidst thousands of thoughts about the name, I suddenly felt lost for ideas. Subconsciously, I was searching for the perfect blend of creativity and meaning, a name that not only symbolizes the blog but also becomes a part of myself.
So here are my tips for deciding on a blog name:
- Make it easy. My blog name isn’t the easiest for people to spell, and even I sometimes jumble it. So, my top tip would be to make sure that your blog name is easy for people to type or spell out loud. I’ve seen blog names that are extremely long, contain words that are difficult to spell, and so on. Instead, you should make it as easy as possible for your readers to find you.
- Think about what you’ll be writing about. Think about the topics you want to write about, who your target audience is, and more. Then, jot down descriptive words that are related to each of those points. Brainstorming like this is a good way to come up with a blog name!
- Use a thesaurus to find similar words. If your first or second name choices are taken or if you want to see if there are some catchier sounding blog names, using a thesaurus can help you with some new ideas.
- Related to your niche. Ideally, readers should know your niche from the blog title. For this, consider using relevant keywords.
- Make it catchy. You may want to think of something funny, use alliteration, or something else to make your blog name catchy and memorable.
- Use your name. If you don’t want something catchy and/or if you think you’re not creative enough, then just use your name. It’s super easy that way, and more and more people are starting to do this.
- No longer than 2-3 words. While some blogs with long names are highly successful, the best practice is to keep them short.
- Easy to spell and remember. For optimal brandability, avoid using numbers or special characters in the blog name.
What if I can’t decide on a blog name (or topic yet)?
If you’re coming up short on ideas for how to name your blog, or which topics you should blog about in the first place (aka your “blog niche“), just get started anyway! If you’re like the majority of us, you’ll find clarity by taking action and getting started today—rather than spending time trying to come up with the perfect idea. You’ll find your groove as you make progress, but if you want some inspiration, check out this list of profitable niches to see if it sparks anything for you.
What happens if the blog name I want to use isn’t available?
When you start your blog with a hosting company like Bluehost, they’ll let you choose your domain name later. If the domain name you want isn’t available, don’t get hung up at this stage—just select their option to choose your name later after getting everything else set up and you can have more time to think (remember, execution is what you’re here for, not perfection). You could also your hand at my free domain name generator tool and get dozens of related (available) blog name ideas to spark your inspiration.
Can I change the name of my blog later?
Yes, you can easily change the name of your blog later, you’ll just need to buy a new domain name (around $10). While the name you choose for your blog is important, it’s something you can always change in the future—so don’t let this step hold you back. What’s most important is that you choose the right niche—see my full list of profitable niches for some inspiration.
4. Design Your Blog.

If you want to start a blog and make money as a blogger, WordPress is the best blogging platform
Let’s cover some basic terminology, so you understand why WordPress is the right platform (also known as a Content Management System or CMS) to run your blog on.
What is a Content Management System (CMS)?
A Content Management System (or CMS) is where you’ll be writing, designing, and publishing your blog posts. A good CMS (like WordPress) is easy to use, lets you organize your great content, upload images and videos, and have control over how your entire blog looks using blog themes or custom design elements. The CMS you’ve most likely already heard of is WordPress.
What is WordPress?
WordPress is the most popular CMS in the world, with millions of bloggers using it every day (including me). In fact, the latest blogging statistics show that over 60% of all blogs run on this CMS, including the websites for Forbes, New York Observer, TED, Thought Catalog, TechCrunch, NBC and others.
Should I start a blog on WordPress (and is WordPress free)?
Of course there are other CMS options you can look into (such as Wix, Squarespace, Tumblr, Blogger, Medium or Ghost), but I strongly recommend setting up a self-hosted WordPress blog as it’s the most sustainable, long-term CMS. Using WordPress, you can start a blog for free (you’ll just need a web hosting plan to get your blog live) and it’s really the only option worth considering if you’re starting a blog with the eventual goal of making money in some way, shape or form.
Now, one thing you need to be careful of, is that WordPress comes in two very different platforms. There’s WordPress.com and WordPress.org. They have almost the same name, but there are very big differences between the two:
WordPress.com:
- Is free to use (with heavy restrictions)
- Doesn’t let you pick a custom domain name (i.e. 👉 yoursite.wordpress.com)
- Has very limited monetization options (you can’t sell your own ads)
- Doesn’t let you upload plugins (for email capture and other things)
- Has limited blogging theme support so you’re stuck with very basic designs
- You have to pay to remove WordPress branding and get your own domain like yoursite.com
- Limited SEO (Search Engine Optimization) and analytics
WordPress.org:
- Fully customizable design (using WordPress themes), unlimited plugin options, and no branding
- Your own custom domain name for your blog to run on (like ryrob.com)
- Total control over your own monetization efforts
- Powerful SEO features with great plugins (so people can find your site easier)
- Let’s you start or add an eCommerce store or membership site
- Small monthly fee (from the cheap hosting plan you use to get your blog online)
- A free domain name during sign up (with most blog hosting platforms)
Right now, you can simply follow the step-by-step guide below to install WordPress on your brand-new domain! It’s quite a simple process, and you can use the WordPress installer you’ll find on the DreamHost dashboard
It’ll just take a few seconds.
Step 1: Checking Website Status
Upon logging in to your Dreamhost account, you will land on the Control Panel, also known as cPanel.
To begin, go to the “Home” tab, where you can check the status of your website:
Situation A: If the status bar is not at 100%, your website is not ready to operate fully. Simply wait a bit more before proceeding to “Step 2.”

Situation B: If the website is ready to operate, a message confirming this will be displayed. In such cases, you can proceed with the WordPress installation in “Step 2.”

Situation C: If the website is almost ready to operate, but you are asked to follow a guided setup, please do so.

*During this process, when prompted to select the purpose of your website, you can choose “None” as it won’t affect your experience.
Step 2: Installing WordPress
To install WordPress, there are two simple methods you can use:
Method 1: Click on the “Install WordPress Now” button directly from the “Home” tab, as shown below.

Method 2: Alternatively, navigate to “WordPress” -> “Install WordPress,” then select the website where you wish to install WordPress and proceed.

*You may need to fill in some details, such as the website’s purpose. Select “None” for the purpose as it won’t impact your experience.
Step 3: Finalization
Once you have completed the WordPress installation, Dreamhost will send you an email containing your wp-admin username and a link to set up a password.

*In case the link has expired, click on the word “here” to generate a fresh one.
To access your WordPress Dashboard, use the provided username and password by logging in via domain.com/wp-admin (replace “domain.com” with your actual domain name).

Spend time familiarizing yourself with the admin area of your WordPress blog. You’ll develop a much deeper understanding of how WordPress works and which things you can quickly change about your site’s visual appearance and functionality over time.
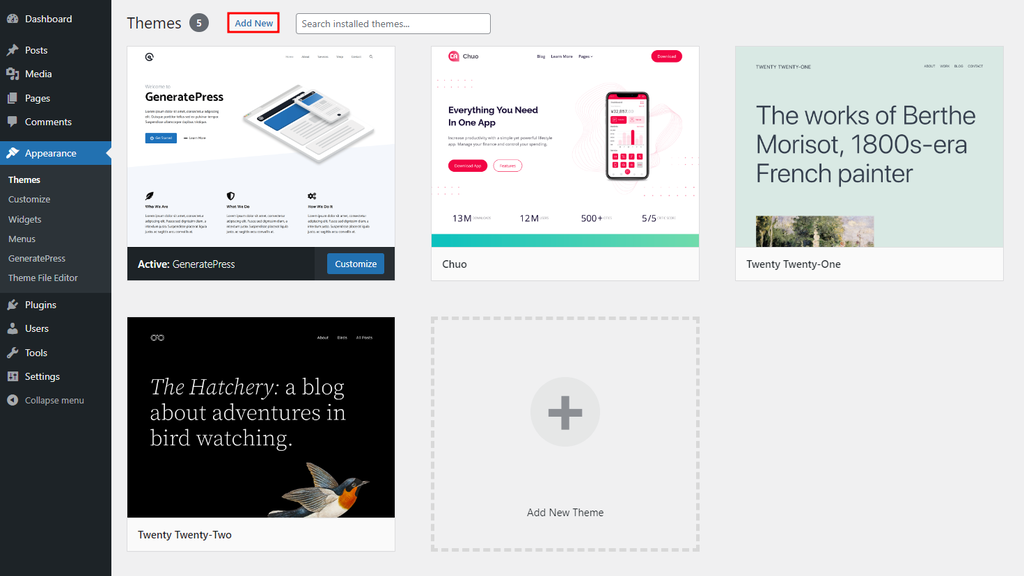
Pick a WordPress Theme
The first part of setup for a blog is selecting a template. Like your blog’s name, its look and feel will be an important part of its personality
Be sure to pick one that conveys your blog’s subject area. There are website templates for bloggers of any genre, whether you’re a food blogger, photography blogger or business blogger. As you browse, think about the mood you want your website to communicate, for example. whether it’s classic, modern, rugged or minimalist.
When you’re still new to starting a blog, I don’t usually recommend buying a paid WordPress theme right away. Once you have some traffic and can justify the investment, then it’s smart to choose a premium theme with more features and options. For right now though, a complex blog theme will be a distraction from your most important priority of bringing readers to your new blog.
I recommend choosing Kadence WP, Elementor for WordPress or Astra (all of which are 100% free blog themes—they’re lightning fast and also have the ability to upgrade to their premium theme versions at affordable price points later on).
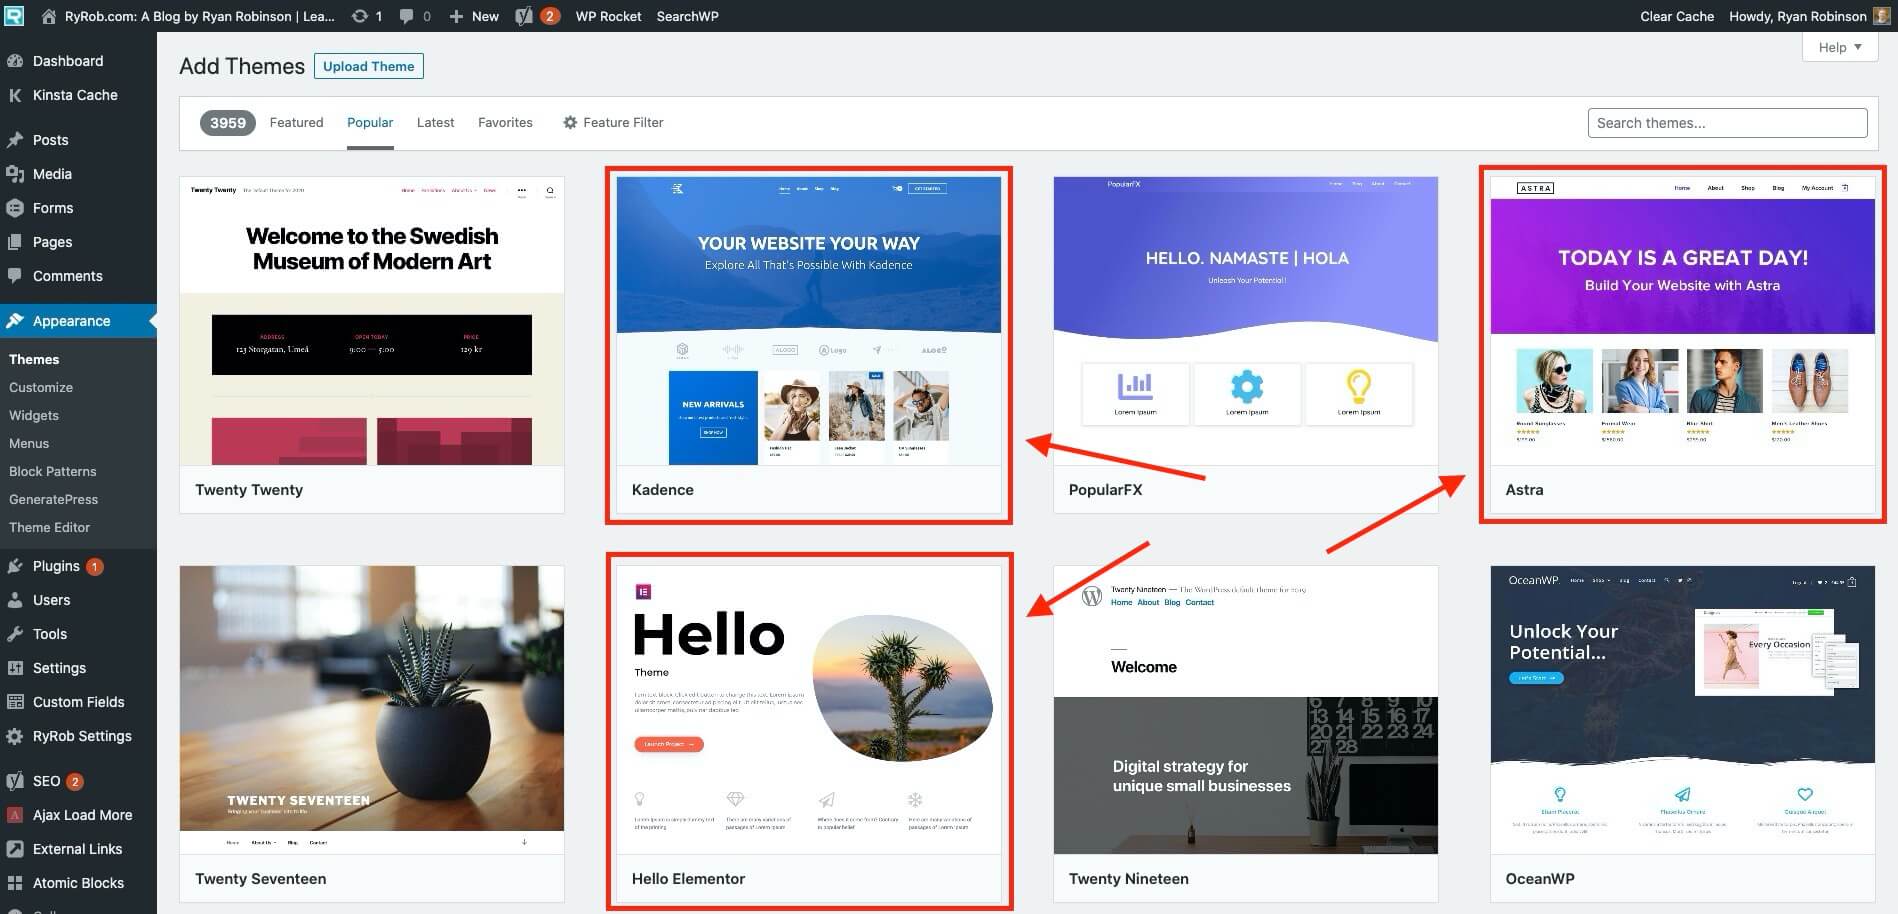
To install a theme from the WordPress directory, log in to your dashboard and navigate to Appearance →Themes →Add New. Hover over your chosen blog theme and click Install. Once the process is complete, hit Activate.
When looking for the best WordPress theme for your blog, consider these crucial factors:
- Pricing. If you’re contemplating a premium blog theme, make sure it is worth the price. Consider comparing it to other similarly priced themes.
- Design. The design of the theme should fit the content of your blog. When in doubt, always prioritize user-friendly and simple designs that highlight each blog post.
- Features. Check whether the theme includes features like a drag-and-drop builder, premade layouts, and customer support.
- Responsiveness. Use a responsive theme that will adapt to any screen size. This is important since over half of all website traffic comes from mobile devices.
- User reviews. Before purchasing a theme, check whether other people have had a positive experience with it.
Once you’ve settled on the right theme for your WordPress blog, it’s time to dive into the world of WordPress plugins, to help unlock even more customizations of your blog design & functionality. This is the necessary prep work in order to give your blog a chance of developing into a real business over time.
What is a WordPress plugin and why are they important?
A WordPress plugin is a small piece of software that can be thought of as an “add-on” that gives extra features or functionality to your blog. Plugins let you add all sorts of features from collecting email subscribers, to nailing your blog SEO, tracking your website analytics, optimizing your images, increasing your blog’s page load speed and more.
A WordPress plugin is an extension that expands a website’s functionality. Plugins provide extra features and can be installed easily with no coding necessary, making them excellent for beginner bloggers.
Different plugins serve different purposes. Some improve site security, while others can perform backups, enable contact forms, moderate comments, or integrate Google Analytics.
The only problem with WordPress plugins, is that there are literally thousands of different plugins and blogging tools to choose from out there. To help you cut through all the noise though… these are the must-have WordPress plugins to install when you start blogging today:
- Hostinger WordPress Plugin: An in-house, pre-installed plugin that guides users through the website setup process. When combined with the Hostinger AI Assistant plugin, you’ll get an AI blog post generator on your WordPress dashboard.
- iThemes Security. Use it to extend the security features of your WordPress site.
- WPForms: Create forms easily with its drag-and-drop interface.
- Akismet Spam Protection: Activate this to combat spam and clean up your blog’s comments section.
- MonsterInsights: Link your blog with a Google Analytics account to monitor performance.
- Yoast SEO: The more people that can find your content, the better your blog will do. The Yoast SEO plugin for WordPress helps you to optimize your blog post titles, meta titles, meta descriptions, content length and other elements across your entire blog so that you can be found easier by search engines. This is by far the most established, best SEO plugin on the market, and worth installing on your blog first. Be sure to use my free meta title generator & meta description generator tools, too.
- UpdraftPlus: Sometimes things will go wrong on your blog (and it won’t always be totally in your control). It’s always smart to have a backup plugin that’ll save all your hard work on a regular basis, and this free one stands high above the rest.
- Bunny CDN: Speaking of speed, Bunny.net makes a fantastic WordPress plugin-based CDN that’ll make images and other static elements of your blog load at lightning speed, earning this plugin top marks to consider as a complement to also using WP Rocket.
- MightyShare: Automatically generate social share images in WordPress for free. Rather than having whichever boring social share image your blog uses by default, this free plugin automatically generates beautiful social images using multiple templates, fonts, color choices and robust customization. It includes support for all post types, multiple templates and new templates added monthly.
How to Install a WordPress Plugin on Your New Blog?
The fastest way to install a WordPress plugin is to find it within the plugin directory once you’re logged into your blog. To do that, follow these simple steps:
1. Navigate to Plugins > Add New:
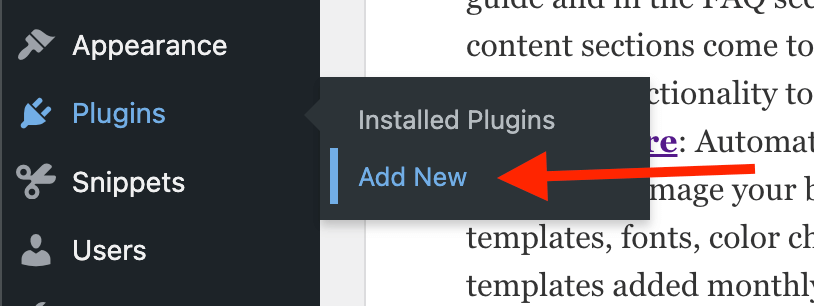
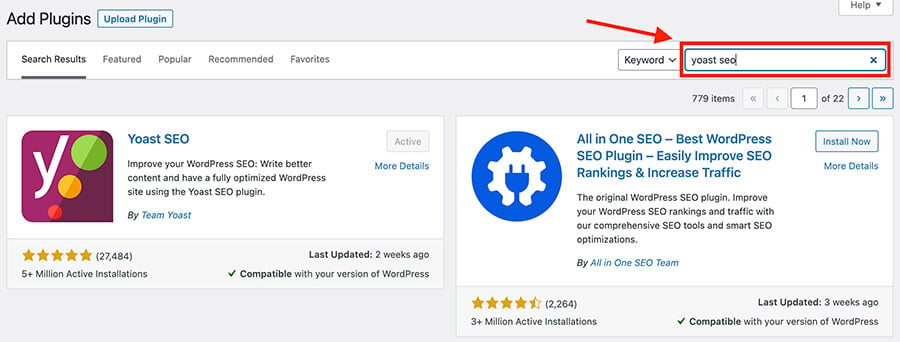
2. Search for the WordPress Plugin You Want to Install:
In this example, I’ve searched for the Yoast SEO WordPress plugin (which is an essential search engine optimization plugin you’ll want). If it weren’t already installed on my blog, you’d see the big “Install Now” button where it currently says “Active” here:
3. Click Install Now on Your Plugin of Choice:
Once you’re ready to install the plugin you’ve searched for (or browsed the top charts to see what’s popular) on your WordPress site, click the “Install Now” button and it’ll be added to your blog. The last step will be clicking “Activate” on the plugin once it’s successfully installed.
5. Create the Main Pages of Your Blog.
Website pages contain the content of a site. Unlike posts, a standard web page requires little to no edits or updates. The most common types of pages on blog websites are the following:
Here’s an overview of the different options when designing your blog:
01. Contact page:
This is a place to put your email address so that fans and potential business partners can reach out to you. You can also include a contact form so that people can send a message directly through your site.
02. Homepage.
Your homepage isthe introductory page of your blog. This is what visitors will see when they enter your domain name into their browser’s address bar. The homepage should include snippets of your best and latest blog posts.
03. About page.
This is the section of your site where visitors can learn more about the person or organization behind the blog. The page may include a bio, the objectives of the site, and relevant images.
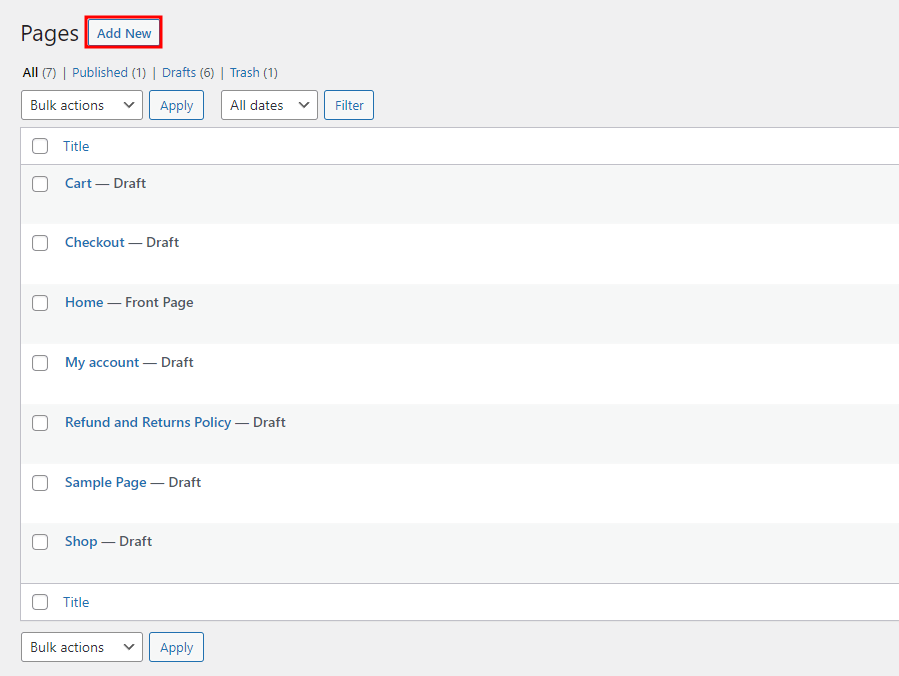
To create a page, open the WordPress dashboard and go to Pages → Add New. You will be taken to the Gutenberg editor. Use it to write and format the page copy and add relevant images, videos, forms, or other page elements you want to use.
Remember that a WordPress post differs from a page. Posts are primarily used for individual blog posts, while pages commonly appear in your navigation menu.
Another important factor for your blog is post categories. This lets you group specific blog posts together, making them more organized and easier to find.
04. Create a Blog Logo
Complete your website with an attractive blog logo. This is a great way to add personality to your site and an essential step if you want to develop your blog into a recognizable brand.
05. Choosing a Logo Design
You can design it yourself or hire someone, but another option is to use online logo makers. These tools allow you to customize your logo with your favorite colors, fonts, and icons. They are often quicker and more affordable than hiring a professional designer.
Online Logo Makers
There are many online logo makers you can use to create your blog logo, such as:
- Canva: Offers a wide range of pre-made logo templates that you can customize to your liking.
- LogoMaker: Easy to use with many options for icons and fonts.
- Hatchful by Shopify: Helps you create beautiful logos in just a few simple steps.
Placing Your Logo
Once you’ve created your logo, place it in the upper left-hand corner of your website and link it to your homepage. This not only helps with brand recognition but also improves the navigation experience for your readers.
Benefits of a Logo for Your Blog
A beautiful and professional logo can:
- Increase Brand Recognition: Helps readers easily recognize and remember your blog.
- Show Personality: Creates a unique identity and sets your blog apart.
- Improve User Experience: Makes your website look more professional and easier to navigate.
06. Get Your Blog Indexed on Search Engines
A critical part of starting a blog is ensuring it’s visible on Google and other search engines. This step is crucial if you want your content to appear in search results, so it’s important to address this early on.
Indexing Your Site on Google
First, you need to ensure that your site is indexed on Google. Indexing essentially means informing Google that your blog exists. You can achieve this by submitting your sitemap to Google Search Console.
How to Submit Your Sitemap to Google Search Console:
- Sign in to Google Search Console: If you don’t already have an account, you can create one for free.
- Add Your Site: Click on the “Add Property” button and enter your blog’s URL.
- Submit Your Sitemap: Navigate to the “Sitemaps” section in the sidebar, enter your sitemap URL, and click “Submit.”
Why Google Search Console is Essential?
Google Search Console is not just important for indexing your site; it’s also a valuable tool that you’ll use throughout your blogging journey. Here’s why:
- Monitor Site Performance: It provides crucial data about your site’s visitors, including how they found your blog and what keywords they used.
- Identify Issues: The console alerts you to any problems Google encounters when crawling your site, allowing you to fix these issues promptly.
- Improve Content: By analyzing data on clicks, impressions, and average position in search results, you can optimize your content to better meet the needs of your audience.
Tips for Optimizing Your Blog for Search Engines
While getting indexed is the first step, optimizing your blog for search engines will help increase your visibility and attract more readers. Here are a few tips:
- Use Relevant Keywords: Incorporate keywords that your target audience is likely to search for in your blog posts.
- Create Quality Content: High-quality, informative content is more likely to be favored by search engines.
- Optimize Meta Descriptions: Write compelling meta descriptions that include your main keywords to improve click-through rates from search results.
- Build Backlinks: Links from other reputable websites to your blog can boost your search engine ranking.
6. Brainstorming Blog Topics.

Now that your blog is technically set up and ready to go, it’s time to think about which topics you’ll start with. Generating great content begins with choosing the right topics, so let’s dive into how you can brainstorm effectively.
Reflect on Your Experiences
Start by considering your personal experiences, successes, failures, or discoveries related to your niche. Ask yourself:
- What insights can I share?
- What ideas do I want to explore in-depth?
Writing about your own experiences can set your blog apart from others. For example, on Making Sense of Cents, I prefer writing about topics I have firsthand experience with. This personal touch not only differentiates my content but also makes it more engaging and authentic.
Answer Reader Questions
Reader questions are a goldmine for blog topics. If you receive questions through emails or comments, consider turning those into blog posts. This way, you can share your knowledge and expertise in a detailed manner. Plus, if one person has a question, many others likely do too. This approach also makes it easy to provide a comprehensive answer by simply sending the link to your post in the future.
Leverage Research and Articles
I read a lot of articles daily for fun and sometimes stumble upon topics that deserve more attention or that many people don’t fully understand. If you come across an interesting statistic or concept, consider expanding on it in a blog post. Sharing your insights from research can provide valuable content to your readers.
Brainstorming Sessions
Occasionally, take the time for a brainstorming session. While having a long list of potential content ideas is great, keeping it fresh and updated is important. Here’s what you can do during these sessions:
- Review older content to see if you can expand or update it.
- Identify popular topics on your site using tools like Google Analytics or Pinterest Analytics.
- Think of new angles or subtopics for popular subjects on your blog.
Survey Your Readers
Directly asking your readers what they want to read more about can generate a wealth of blog post ideas. Conduct surveys or ask for feedback in your blog posts and emails. This method can quickly and easily add new topics to your content list.
Use the Topic Cluster Model
Another method to generate ideas is the topic cluster model. This method involves organizing related posts using a series of internal links. It’s not only an SEO strategy but also a way to create a mind map for ideas.
Start with a broad topic—let’s say recipes. Break it down into smaller subtopics, like dinner recipes or brunch recipes. Then, further divide those into even more specific topics, like 20-minute dinner recipes, mimosa recipes, or cake decoration ideas. Each of these could become its own blog post.
7. Write your first blog post.
With the pre-launch process completed, it’s time for you to start considering writing your inaugural blog post. Below are some friendly tips to ensure each new post resonates effectively:
1. Clarity and Conciseness
Utilize straightforward language and maintain short, digestible sentences and paragraphs. Avoid overwhelming readers with large blocks of text.
2. Employ Headings, Subheadings, and Lists
Structured formatting assists readers in quickly locating the information they seek, especially when skimming through your post.
3. Enhance with Images and Graphics
Visual content enhances engagement and comprehension. This is particularly crucial if you’re crafting a how-to guide or aiming to present data in a more accessible format.
4. Ensure Originality
Utilize a plagiarism checker to guarantee your content remains unique. This step is especially vital if you’re employing AI writing tools for content creation.
5. Apply SEO Best Practices
Incorporate search engine optimization into your writing and publishing process using tools like Yoast SEO. Crafting SEO-friendly content can significantly boost your blog’s visibility on search engines.
Steps to Craft Your First Blog Post on WordPress
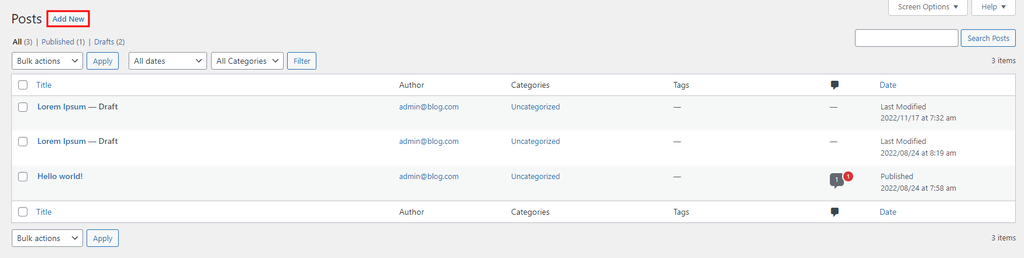
Step 1: Log in to Your WordPress Dashboard
Navigate to Posts → Add New. You’ll be directed to the WordPress text editor – your tool for writing and formatting content.
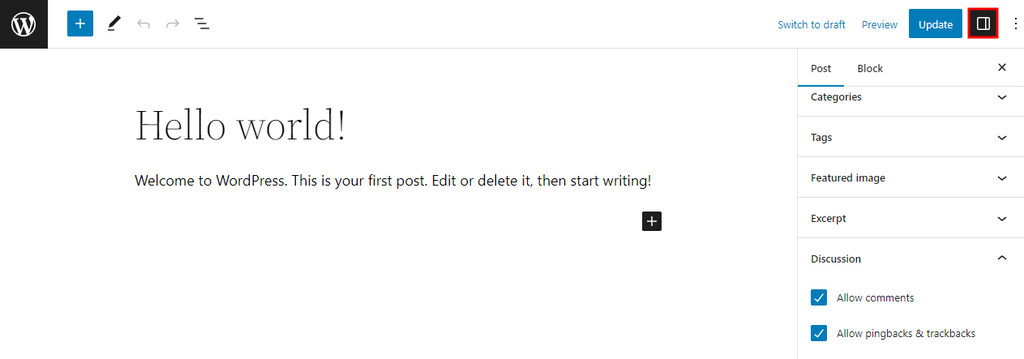
Step 2: Utilize the WordPress Editor
The WordPress editor enables you to add and edit blocks for various content types. These blocks can include text, media, design features, widgets, and code. To add a new block, simply click the + button within the editor.
Step 3: How to Create Blog Titles That Attract Readers
A blog title is a small but mighty piece of content. Often, it makes the difference between whether or not people click on your article.
To create blog titles that grab attention and compel readers to click, consider the following strategies:
1. Be Clear and Direct
Readers appreciate knowing exactly what they’ll get from your article. A clear and direct title sets the right expectation and helps your content stand out in a sea of vague headlines.
Example: “10 Easy Steps to Improve Your Writing Skills”
2. Promise Value
Your title should convey the benefit or value that the reader will gain by reading your post. Highlighting the takeaway can entice readers who are looking for specific information or solutions.
Example: “How to Save Money on Groceries: 5 Proven Tips”
3. Appeal to Emotions
Emotionally charged titles can be very powerful. Whether it’s happiness, fear, excitement, or curiosity, tapping into readers’ emotions can make your content irresistible.
Example: “The Heartwarming Story of a Dog’s Journey Home”
4. Pique Curiosity
Curiosity-driven titles can be incredibly effective. By hinting at something intriguing without giving away too much, you can draw readers in to discover more.
Example: “You Won’t Believe What Happened at This Small Town Café”
5. Use Humor, Alliteration, or Wordplay
A clever title can catch the eye and make your content more memorable. Humor, alliteration, or wordplay can add a fun twist that makes your article stand out.
Example: “Bargain Bonanza: Shopping Secrets for Smart Savers”
The do’s and don’ts of writing a blog post introduction
Do:
- Use colorful language
- Open with a startling statistic
- Start with a quote
- Use drama or humor
- Leverage eye-catching formatting (like bold and italics)
Don’t:
- Use a cliche that’ll leave readers rolling their eyes
- Bury the lede (failing to tease the most interesting point in your article)
- State the obvious
Step 4: Write engaging content
Does my blog need to have a niche right away?
The sooner you’re able to define a niche once you start your blog, the better. The reason your blog needs a niche, is that it gives it focus. Your niche is how you’ll plan your content calendar, decide on design and know how to market your blog. It also informs how your audience will find you and how you’ll make connections with other bloggers.
Writing a blog post is a blend of creativity and structure, requiring both engaging content and organized formatting. Here’s a comprehensive guide to help you craft compelling blog posts that resonate with your audience.
Introduction: Captivate Your Audience
The introduction is your first impression, so make it count. Start with a captivating anecdote, a compelling quote, a surprising statistic, or an interesting fact to grab your readers’ attention. For instance, you might open with a startling statistic about the importance of content marketing or a brief story that illustrates the topic’s relevance.
Example Opening: “Did you know that businesses with blogs generate 67% more leads than those without? In today’s digital age, having a well-crafted blog can be a game-changer for your business. This article will guide you through the essentials of creating engaging blog posts that not only attract readers but also convert them into loyal followers.”
Follow up with a brief summary of what the article will cover, ensuring you pique your readers’ interest and encourage them to read on.

Body: Share Your Expertise
In the body of your blog post, structure your content with clear headers and sub-headers to make it easy to navigate. This is where you dive into your topic, sharing your knowledge and insights. Use your outline as a roadmap to ensure you cover all necessary points.
1. Use Headers and Sub-headers:
- Break up your text with descriptive headers.
- Sub-headers can help organize detailed sections.
2. Provide Value:
- Share original insights and actionable tips.
- Avoid filler content; every sentence should serve a purpose.
3. Maintain Reader Engagement:
- Use a tone that resonates with your audience, whether it’s conversational and humorous or professional and formal.
- Include examples, anecdotes, and data to support your points.
Example Body Section:
Understanding Your Audience
“Before you start writing, it’s crucial to understand who your audience is. Are they industry experts or beginners? Tailoring your content to their level of knowledge and interests will make your blog more relevant and engaging.”
Conclusion: Tie It All Together
A concluding section is a great way to wrap up your post, though it’s optional. Use it to summarize the key points discussed and share your final thoughts. This can also be a place to encourage reader interaction, such as leaving comments or sharing the post on social media.
Example Conclusion:
“In conclusion, crafting a compelling blog post involves a mix of engaging content and strategic structuring. By understanding your audience, providing valuable insights, and maintaining a clear, conversational tone, you can create posts that resonate and drive action. Happy blogging!”
Tips for Efficient Blog Writing
Writing a blog post can be time-consuming, often requiring several hours. Here are some tips to streamline the process:
1. Plan Ahead:
- Research and outline your content before you start writing.
- Set aside at least half a day for your first draft.
2. Utilize AI Tools:
- Consider using AI content generation tools like OpenAI’s Chat GPT, Google’s BARD, or Jasper.ai to aid in research and content creation.
- Remember to edit heavily, fact-check, and infuse your unique voice into the AI-generated content.
3. Revise and Edit:
- After writing your first draft, take a break before revising.
- Check for clarity, coherence, and grammatical accuracy.
Step 5: Optimizing SEO for Your Blog Post
After creating your content, there are a few steps you need to take before hitting “Publish.” These steps primarily revolve around strategy, from improving your blog’s SEO to generating conversions through your article. Here’s a quick post-writing checklist to guide you:
1. Double Check Your Keywords
Use the search function (CTRL+F) to review your use of keywords. Did you include all the keywords you intended to? If not, see if there are any other opportunities to incorporate the keywords naturally into your content. Remember, keyword stuffing is bad practice, and search engines can penalize you for it. Integrate them naturally into the text rather than forcing them in.
2. Add Internal Links
A handy trick for bloggers is to link between their blog posts (also known as internal linking). This helps improve your post’s SEO and encourages readers to browse your other articles. Rather than linking randomly, link between primarily related blog posts; this is better for SEO and makes the links more valuable to your readers. If you’re just starting and don’t have much content yet, go back and add links to your posts later.
3. Incorporate CTAs
Another useful tactic is to include calls-to-action (CTAs) throughout your article. These snippets often take the form of phrases such as “Buy Now,” “Subscribe,” or “Read More.” By placing call-to-action buttons in your article, you can direct readers to buy your products, subscribe to your newsletter, or click for further reading.
4. Use Alt Text
Since Google can’t read images, bloggers often add a short description to each image (ideally using keywords) to help the search engine understand what is being displayed. This description, called alt text, helps your images show up in Google image searches.
5. Write Your Post’s Metadata
Metadata is the text used to display a web page in Google search results. This includes the meta title (also known as the title tag) and meta description. Sometimes, the meta title is the same as the title of your blog post, while other times, you’ll want to choose a slightly different title for displaying your post. There’s no right or wrong here, as long as your title is engaging and includes your most important keyword. The meta description, the short snippet of text beneath the meta title, should also include your main keywords and preview the article’s main points.
6. Choose Your URL
Every webpage has a dedicated URL, and your blog posts are no different. A strong URL helps your articles rank high on search engine results pages and typically contains a keyword. Blog post URLs often take the form of www.yourdomainname.com/blog-post-keyword or www.yourdomainname.com/blog/blog-post-keyword.
Step 6: Preview and Publish
Now that you’ve crafted your first blog post, it’s time to give it a final polish before sharing it with your audience. Consider giving it a couple of reads through and asking family members or friends to review it as well. Additional feedback can provide valuable insights and help ensure your content is top-notch.
Once you’re confident that your article is ready to go, it’s time to upload it to your blog. Your blogging platform will likely have sections where you can input metadata, such as the meta title and description, as well as the URL for your post. Make sure to fill these out thoughtfully, as they play a crucial role in how your post appears in search engine results.
After completing these steps, it’s time to hit the Publish button and share your content with the world. Don’t forget to celebrate this milestone achievement—it’s an exciting moment in your blogging journey!
8. Find ways to grow your blog.
In the crowded world of blogging, finding ways to grow your blog and attract readers is essential. While improving your SEO is a crucial step, there are numerous other strategies you can implement to drive traffic to your site. Most of these methods are free, though some involve paid promotions. Here are some effective ways to promote your blog and build a loyal readership.

Share on Social Media
Social media is a powerful tool for promoting your blog and reaching new readers. Platforms like Facebook, Instagram, Twitter, and LinkedIn offer excellent opportunities to share your content. Each platform has unique characteristics and user demographics, so it’s important to choose the ones that align with your blog’s niche and target audience.
With approximately 3 billion monthly active users, Facebook is the largest social network. It is particularly popular among men aged 25-34. To leverage Facebook, ensure your blog is mobile-friendly since most users access it via mobile devices. Regularly posting your blog content and engaging with your followers can help drive traffic to your site.
X
X boasts over 300 million monthly active users and is known for real-time updates on various topics. Its user base is predominantly male. Utilize Twitter to share timely and relevant blog posts, participate in trending conversations, and use hashtags to increase visibility.
Instagram is ideal for blogs with visually appealing content. With over 1 billion monthly active users, it is particularly popular among millennials. Use high-quality images and engaging captions to promote your blog posts, and consider using Instagram Stories and IGTV for additional exposure.
LinkedIn is perfect for professional and niche content. Publishing articles on LinkedIn can help you establish yourself as an expert in your field. Engage with professional groups and share your blog posts to reach a broader audience.

Pinterest is a visual curation platform with over 450 million monthly active users, primarily women. If your blog content is visually oriented and targets a female audience, Pinterest can be a powerful tool. Create eye-catching pins and link them back to your blog posts to drive traffic.
TikTok
TikTok, the fastest-growing social network, has over 1 billion monthly active users, mostly from Gen Z. Create short, engaging videos that summarize your blog content and direct viewers to your site. This platform is especially useful for reaching a younger audience.
Create a Blog Newsletter
Building a blog newsletter is an effective way to keep your readers engaged and encourage them to return to your blog. Send out a weekly email newsletter featuring your latest posts, updates, and exclusive content. To grow your email list, include a prominent Subscribe button on your website’s navigation bar, footer, and within blog posts.
Write for Other Sites
Publishing content on other websites can help you reach a new audience and establish your credibility as a writer. Consider starting a Medium account, contributing articles to LinkedIn, and looking for guest blogging opportunities on high-profile publications like Forbes and Entrepreneur. This not only drives traffic to your blog but also enhances your online presence.
Reach Out to Existing Communities
Engage with online communities that align with your blog’s niche. Facebook groups, LinkedIn groups, and forums are excellent places to share your content and network with like-minded individuals. Participate in discussions, provide valuable insights, and subtly promote your blog when relevant.
Participate in Question and Discussion Sites
Platforms like Quora and Reddit allow you to share your expertise and link back to your blog. Answer questions related to your blog’s topics and provide helpful, informative responses. Ensure your contributions add value to the conversation rather than coming across as purely promotional.
Invest in Paid Ads
While organic methods are effective, investing in paid ads can amplify your reach. Boost your social media posts with paid promotions to target a larger audience. Additionally, consider using Google Ads to attract new users through the search engine. Paid ads can provide a significant traffic boost and help you reach readers who might not find your blog organically.
Try New Content Formats
Diversifying your content formats can help you reach a broader audience. Consider repurposing your blog posts into videos, podcasts, or webinars. Starting a YouTube channel or a podcast can attract viewers and listeners who prefer consuming content in different formats. Experimenting with various content types can increase your blog’s visibility and attract a wider audience.
Incorporate Social Media into Your Blog
Integrating social media features into your blog can enhance your content’s shareability and engagement. Use social media plugins, especially if you run a WordPress blog, to add social media icons, sharing buttons, and like buttons. Encourage readers to follow your social media accounts and share your blog content with their networks.
But, if you want to increase your page views, here are my tips:
Publish High-Quality Blog Posts
High-quality content is the cornerstone of a successful blog. Readers come back to blogs that offer valuable and helpful posts. Aim for your blog posts to be at least 500 words, but longer posts (1,500 to 3,000 words) tend to perform better. This post, for instance, is over 6,000 words to provide comprehensive insights.
Be Active on Pinterest
Pinterest is one of the top traffic sources for many bloggers. To increase your pageviews:
- Create Great Images: Use tools like Picmonkey to edit your images.
- Catchy Descriptions and Titles: Ensure your pins are eye-catching and descriptive.
- Pin Regularly: Consistency is key. Use scheduling tools like Tailwind to maintain a regular pinning schedule.
- Use Long Images: Longer images perform better on Pinterest, so make sure to use them.
Be Active on Other Social Media Sites
Social media platforms are invaluable for interacting with your audience and reaching a larger audience. While Pinterest is a top traffic source, consider diversifying your efforts on platforms like Facebook, Twitter, Instagram, Snapchat, YouTube, and more.
Post Regularly
Consistency is crucial. Aim to publish new content at least once a week. Regular posting keeps your audience engaged and prevents them from forgetting about your blog.
Network with Other Bloggers
View other bloggers as friends and colleagues, not competition. Network by:
- Interacting on Social Media: Engage with their posts and share valuable insights.
- Reaching Out via Email: Send genuine and friendly emails to build relationships.
- Attending Conferences: Participate in blogging conferences to meet other bloggers in person.
- Offering Value: Always give more than you take in these interactions.
Guest Post
Guest posting allows you to reach a new audience and build partnerships with other bloggers. Look for guest posting opportunities on blogs that align with your niche.
Make It Easy to Share Your Content
Facilitate sharing by:
- Visible Social Media Icons: Ensure your social media icons are easy to find.
- Pre-filled Information: Include the title, link, and your username in sharing options.
- Avoid All-Caps Titles: Titles in all caps can come across as shouting and deter sharing.
Expert Tip
There is no one social media platform that is best for finding and building a community. You have to look at where your audience is. I’m in B2B, so LinkedIn and Twitter are great – same with YouTube. Some people are in B2C – direct-to-consumer brands – so maybe Instagram, TikTok, and Snapchat are better for them.

Digital Marketing Expert and Entrepreneur
9. Make money blogging: A Comprehensive Guide:
Blogging is not just a hobby; it can also be a lucrative venture if you know how to monetize your blog effectively. Once you’ve built a considerable following, there are several ways to turn your blog into a source of income. Here’s a comprehensive guide on how to make money blogging, including some of the most common and profitable methods.

Affiliate Marketing
Affiliate marketing is one of the most popular ways to monetize a blog. By becoming a brand affiliate, you can earn commissions by promoting products or services. When a blog visitor purchases a product through your affiliate link, you earn a commission, typically ranging from 5-30% of the product’s price. The actual rate depends on the affiliate program and the types of products you promote.
How to Get Started:
- Join Affiliate Programs: Sign up for affiliate programs like Amazon Associates, ShareASale, or CJ Affiliate.
- Promote Products: Include affiliate links in your blog posts, reviews, and recommendations.
- Disclose Affiliate Relationships: Be transparent with your readers by disclosing your affiliate partnerships.
If you want to learn how to make money blogging with affiliate marketing, read the tips below:
- Provide real reviews. You should always be honest with your reviews. If there is something you don’t like about a product, either don’t review the product or do mention the negatives. Either be honest or don’t work with those companies and products.
- Ask for raises. If you are doing well with a particular affiliate program, then ask for a raise. The worst thing that can happen is that your affiliate manager says no. The best is that they say yes!
- Form a good relationship with your affiliate manager. Your affiliate manager can supply your readers with valuable coupons, affiliate raises, and more. These things help you earn money blogging.
- Publish tutorials. Readers want to know how they can use a product. Show them how to use it, how it can benefit their lives, and more. This is helpful to your readers and to your affiliate income.
- Don’t go overboard. There is no need to include an affiliate link 1,000 times in a blog post. Include them at the beginning, middle, and end, and readers will notice it.
Paid Ads
Displaying ads on your blog is another straightforward way to generate income. By signing up for an ad network, such as Google AdSense, you can connect with brands that want to advertise to your audience. The key is to ensure that the ads do not interfere with the user experience on your blog.
How to Get Started:
- Sign Up for Ad Networks: Join ad networks like Google AdSense or Mediavine.
- Place Ads Strategically: Position ads in places that are visible but not intrusive, such as in the sidebar or within the content.
Sponsored Posts
Sponsored posts involve partnering with brands to write content that promotes their products or services. This method works best if you have a significant amount of traffic and a loyal readership. Brands are willing to pay more for established blogs that can offer greater exposure.
How to Get Started:
- Build Your Audience: Focus on growing your readership and traffic to attract potential sponsors.
- Reach Out to Brands: Contact brands in your niche and pitch your sponsored post services.
- Create Quality Content: Ensure that your sponsored posts are engaging and provide value to your readers.
Sell Digital and Physical Products
Integrating eCommerce functionality into your blog allows you to sell products directly to your audience. You can offer digital products such as eBooks, online courses, or templates, as well as physical merchandise like branded items.
How to Get Started:
- Choose Products to Sell: Decide on digital or physical products that align with your blog’s content.
- Set Up an Online Store: Use platforms like WooCommerce or Shopify to create an online store on your blog.
- Promote Your Products: Market your products through blog posts, social media, and email newsletters.
Offer Paid Subscriptions
Paid subscriptions can provide a steady stream of income by offering exclusive content to your readers. Create high-quality, unique content that subscribers can access for a fee. This method works well if you consistently provide valuable information that your audience is willing to pay for.
How to Get Started:
- Create Exclusive Content: Develop premium content such as in-depth articles, videos, or tutorials.
- Use Membership Plugins: Install WordPress plugins like MemberPress or Paid Member Subscriptions to add paywall functionality.
- Promote Your Subscription: Highlight the benefits of subscribing and promote it across your blog and social media.
Provide Consulting Services
Leverage your expertise and insights to offer consulting services related to your blog’s niche. For example, if you run a nutrition blog, you can offer personalized diet plans or nutrition coaching. This not only provides an additional income stream but also establishes you as an authority in your field.
How to Get Started:
- Identify Your Expertise: Determine the areas where you can offer valuable advice and services.
- Create a Services Page: Add a page to your blog detailing the consulting services you offer.
- Market Your Services: Promote your consulting services through blog posts, social media, and email marketing.
Getting Started as a New Blogger FAQs
Do blogs make money?
Yes, blogs can be profitable ventures with the potential to generate income through various monetization strategies. Common methods include advertising (e.g., Google AdSense), sponsored content, affiliate marketing, selling digital or physical products, offering services and membership/subscriptions. Successful bloggers often diversify their income streams and focus on providing value to their audience to maximize revenue potential.
How to write a blog post with AI?
AI can be a valuable asset throughout the content production process, from generating topic ideas to serving as a proofreader. AI tools like ChatGPT and Bard can help brainstorm blog topics, provide research insights, construct outlines and even write drafts. However, it’s crucial to review and refine AI-generated content to ensure accuracy, relevance and adherence to your brand voice. Additionally, grammar checkers like Grammarly and ProWritingAid can assist in proofreading, but their suggestions should be considered carefully to avoid altering creative writing styles.
How do I make a successful blog?
First of all you’ll need to define ‘successful.’ Generally a successful blog is one which has a large readership, and generates considerable amounts of traffic. But depending on your blog niche, the goals of a successful blog may look different. For some bloggers an engaged readership who share your content widely and look at it as a source of authority and trust, is what defines the success of their blog. For other bloggers how fast, and effectively their blog can be monetized or act as a part of their marketing funnel, would be another indicator of success.
Can you start a blog as a side hustle?
Yes, you can start a blog as a side hustle. In fact, blogging is a popular side hustle for many people, as it can be a relatively low-cost and low-time commitment way to make extra money.
To start a blog as a side hustle, you will need to choose a niche, create a blog and start publishing content. Once you have a following, you can monetize your blog through a variety of methods, such as advertising, affiliate marketing and selling your own products or services.